Looking to harness the power of the sun and save big on your energy bills? Look no further! With our DIY solar panel installation guide, you can learn the basics of installing pv systems yourself and start reaping the benefits in no time. Imagine having your own renewable energy source right at home! Our guide is perfect for both professional installers and beginners interested in ground mount installations. Learn about electrical wiring and more with our comprehensive guide.
By diving into this comprehensive guide, you’ll discover just how easy it can be to embark on a DIY solar project. No need for complicated installations or expensive contractors. We’ll walk you through everything, from selecting the right solar panel kit to understanding photovoltaic panels. Whether you’re looking to set up a ground mount pv system or need guidance on electrical wiring, our guide is here to help. Trust our expert installers to provide the necessary steps and tips for a successful solar project.
So why wait? Take control of your energy future and join the green revolution today by installing solar panels. It’s time to start your DIY solar installation project and tap into the limitless power of the sun while enjoying significant savings. Let’s get started with the help of professional solar installers on your journey towards a brighter and more sustainable future!
Assessing Property and Selecting Optimal Location
Assessing your property and selecting the optimal location for your photovoltaic panel installation is crucial to ensure maximum efficiency and energy generation. By considering factors such as roof orientation, shading, structural integrity, available space, and the expertise of professional installers, you can make informed decisions that will benefit your entire home. Don’t forget to check out our useful articles for tips on inspection and maintenance of your photovoltaic panels.
Before diving into the installation process of solar panels for your entire home, it’s important to determine if your property is suitable. Start by evaluating the orientation of your roof. Ideally, the best location to mount solar panels would be a south-facing roof that receives ample sunlight throughout the day. However, east or west-facing roofs can also be useful depending on the specific circumstances. Take note of any obstructions like tall trees or nearby buildings that may cast shadows on your panels during peak sunlight hours. Additionally, make sure to check out our useful articles on warranties for solar panels.
When assessing your property, it’s important to consider the structural integrity and warranties. Make sure that your roof is in good condition and capable of supporting the weight of solar panels. If there are any existing issues with leaks or damage, it’s crucial to address them before proceeding with installation. Contact us for assistance.
Once you’ve determined that your property is suitable for solar panel installation, choosing the best location within it becomes paramount. Look for an area where there are minimal obstructions and maximum sunlight exposure throughout the day. This could be a clear section of your roof or even an open area in your backyard if ground-mounted panels are an option.
Consider the available space you have for installing solar panels. Calculate how many panels you’ll need based on your energy requirements and ensure you have enough area to accommodate them comfortably. Keep in mind that local regulations may dictate certain setback requirements from property lines or other structures.
Consult with your utility company to understand any specific guidelines they may have regarding interconnection agreements or net metering policies for your solar installation. Being aware of these regulations will help you plan accordingly during the installation process, whether you are working with professional solar installers or embarking on a DIY solar project.
To optimize sunlight exposure and enhance efficiency further, proper racking is essential. Choose a racking system that suits your specific needs and ensures the panels are angled correctly for maximum solar absorption. This will also help mitigate any potential shading issues that may arise from nearby objects.
Designing and Sizing Your DIY Solar System
Calculating your energy needs is a crucial step in designing and sizing your DIY solar system. By determining the amount of energy you consume on a daily basis, you can accurately determine the size requirements for your solar setup. Start by examining your energy bills over the course of several months to get an average daily consumption.
Factors such as climate and usage patterns also play a significant role in designing your solar system. If you live in an area with abundant sunlight, you may require fewer panels compared to regions with less favorable weather conditions. Understanding how you use electricity throughout the day can help optimize your system’s design. For instance, if most of your energy consumption occurs during daylight hours, it might be beneficial to have more panels to capture maximum sunlight.
To create a complete solar system setup, several components are necessary. These include solar panels, inverters, batteries (if you want to store excess energy), charge controllers, wiring, and mounting equipment. Each component has its own purpose and should be carefully selected based on your specific requirements.
When planning a solar installation project, it is crucial to select the appropriate wire gauge for optimal performance. Solar installers should consider the distance between panels and other components when determining the correct gauge. Thicker wires are necessary for longer distances to minimize power loss caused by resistance. Consult a wire size chart or seek expert advice to ensure that your solar inverter and solar battery operate efficiently.
Now let’s dive into designing a customized solar installation project for your home. We will discuss how to install solar panels, choose the right solar inverter, and consider adding a solar battery to your system.
- Determine Your Energy Needs:
- Calculate average daily energy consumption.
- Consider seasonal variations in usage.
- Identify peak load periods.
- Assess Available Space:
- Evaluate roof orientation and shading.
- Measure available surface area for panel placement.
- Ensure proper clearance from obstructions like chimneys or vents.
- Select Solar Panels:
- Compare different types (monocrystalline, polycrystalline, thin-film).
- Consider efficiency, durability, and warranty.
- Calculate the number of solar panels needed for your solar installation based on your energy requirements. Make sure to consider the capacity of your solar inverter and the capacity of your solar battery as well.
- Choose an Inverter:
- Decide between string inverters or microinverters.
- Match inverter capacity to panel output.
- Evaluate features like monitoring capabilities and grid compatibility.
- Battery Storage (optional):
- Determine if you need batteries for storing excess energy.
- Assess battery capacity and lifespan.
- Consider maintenance requirements and cost.
- Install Mounting Equipment:
- Select appropriate mounting system (roof-mounted, ground-mounted).
- Ensure structural integrity and compliance with local regulations.
- Follow manufacturer’s instructions for installation.
By following these step-by-step instructions, you can design a customized DIY solar system that meets your energy needs while considering factors like climate, usage patterns, and wire size. Remember to consult professionals or reputable sources for guidance throughout the process to ensure a successful installation.
Shopping Checklist and Safety Equipment
Creating a checklist of essential items is crucial before embarking on your DIY solar panel installation. This will ensure that you have everything you need to complete the project successfully. Here are some key points to consider when putting together your shopping list:
- Research Reputable Suppliers: Start by exploring reputable suppliers in your area. Look for companies with positive reviews and a good track record in providing quality solar panel equipment. Compare prices from different suppliers to ensure you get the best deal.
- Safety First: Prioritize safety measures throughout the installation process. Investing in proper safety equipment is essential to protect yourself and others involved in the project. Some important safety equipment includes:
- Safety goggles
- Protective gloves
- Hard hat
- Non-slip footwear
- Fall protection gear, such as harnesses and lanyards
- Electrical Safety: As solar panels involve working with electricity, it’s crucial to take electrical safety seriously. Consider including the following items in your shopping list:
- Insulated electrical tools
- Voltage testers
- Grounding equipment
- Fire extinguisher
- Inspect Your Kit: If you’re purchasing a solar panel kit, thoroughly inspect its contents before starting the installation process. Ensure that all components are included and check for any damages or defects.
- Additional Materials: Aside from the solar panels themselves, there are other materials you may need during installation:
- Mounting brackets or racks
- Wiring cables and connectors
- Circuit breakers and fuses
- Sealants for weatherproofing
- Tools of the Trade: Gather all necessary tools required for a successful DIY installation:
- Power drill with various drill bits
- Screwdrivers (both flathead and Phillips)
- Wire cutters/strippers/crimpers
- Level
- Tape measure
- Ladder or scaffolding (if needed)
By preparing a comprehensive shopping list, you can ensure that you have all the necessary equipment and materials for your DIY solar panel installation. This will save you time and prevent delays in the project.
Remember to consider factors such as warranties, maintenance needs, and after-sales support when purchasing your solar panels and related equipment. Reputable suppliers may offer assistance or guidance throughout the process, so don’t hesitate to reach out for help if needed.
With your checklist complete and safety equipment at hand, you’ll be ready to tackle your DIY solar panel installation with confidence. Just remember to prioritize safety throughout the project and take the necessary precautions to protect yourself and others involved.
Now that you have everything you need, it’s time to move on to the next step: preparing your roof for solar inverter installation.
Step-by-Step Solar Panel Installation Process
Installing solar panels may seem like a daunting task, but with the right guidance and a little DIY spirit, you can successfully set up your own solar panel system. In this step-by-step guide, we will walk you through the installation process to help you harness the power of the sun and reduce your reliance on traditional energy sources.
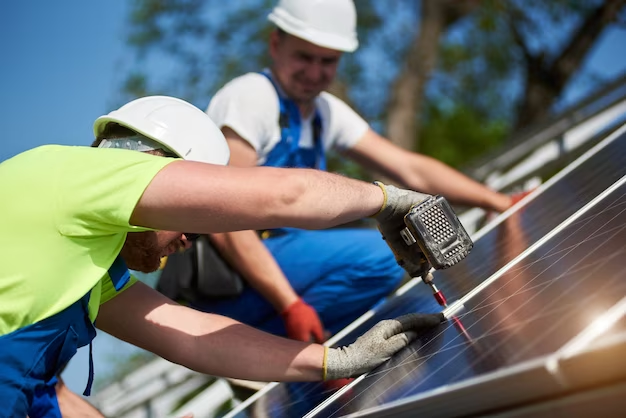
Mounting Solar Panels Securely on Your Roof
The first step in your solar installation project is to mount the panels securely on your roof. Begin by identifying the optimal location for maximum sunlight exposure. Once determined, follow these detailed instructions:
- Ensure that your roof is structurally sound and capable of supporting the weight of the solar installation panels and solar inverter.
- Before starting any work to install solar panels and a solar inverter, be sure to use appropriate safety gear such as gloves and goggles.
- Attach mounting brackets or rails onto your roof using heavy-duty screws or bolts.
- Position each panel onto the mounting brackets and secure them tightly.
- Double-check that all panels are level and aligned properly.
By following these steps, you can ensure that your solar panels are securely mounted, minimizing any risk of damage or accidents.
Connecting Wiring Between Panels, Inverters, Batteries, and Electrical Systems
Once your solar panels are securely mounted, it’s time to connect the wiring between various components such as inverters, batteries, and electrical systems. This crucial step ensures that electricity generated by the panels can be efficiently utilized within your home:
- Begin by installing an inverter near your main electrical panel.
- Connect each panel’s DC output cables to a combiner box or junction where they merge into a single cable.
- Route this combined cable from the combiner box to the inverter’s input terminals.
- Connect batteries (if applicable) to store excess energy for later use.
- Connect the inverter’s AC output terminals to your home’s electrical system using appropriate wiring techniques.
Thoroughly test each connection and ensure that everything is properly grounded to prevent any electrical hazards. Safety should always be a top priority during the installation process.
Testing Each Component Thoroughly Before Finalizing Connections
Before finalizing the connections, it is crucial to test each component thoroughly. This step ensures that your solar panel system functions optimally and minimizes any potential issues down the line:
- Use a multimeter or voltage tester to check the voltage output of each panel individually.
- Verify that the inverter is converting DC power from the panels into usable AC power.
- Test the batteries (if present) to ensure they are charging and discharging correctly.
- Check for any loose connections or faulty wiring that may affect performance.
By conducting these tests, you can identify and resolve any issues before completing the installation process, ensuring your solar panel system operates efficiently.
Ensuring Proper Grounding and Protection Against Weather Elements
The last step in your DIY solar panel installation guide is ensuring proper grounding and protection against weather elements. This ensures the longevity and safety of your system:
- Consult local electrical codes to determine grounding requirements specific to your area.
- Install appropriate grounding equipment such as ground rods or grounding lugs.
- Protect exposed wiring with conduit or suitable weatherproof enclosures.
- Consider installing surge protectors to safeguard against power surges caused by lightning or other electrical disturbances.
Connecting the Solar Inverter and Battery (Optional)
Understanding how inverters convert DC power from solar panels into usable AC power is essential for a successful DIY solar panel installation. Learning about battery storage options can help you make the most of the excess energy generated by your system.
Proper wiring is crucial. Before starting the process, ensure that you have all the necessary tools and equipment readily available. This includes your solar inverter, battery bank, charge controller, electrical wiring, and appropriate connectors.
- Choose a suitable location: Select an area near your solar panels where you can safely install both the inverter and battery. Ensure that there is enough space for proper ventilation and easy access for maintenance.
- Positioning the inverter: Mount the solar inverter securely on a wall or any other stable surface using appropriate brackets or screws. Make sure it is positioned away from direct sunlight to prevent overheating.
- Connecting the positive terminal: Begin by connecting one end of a wire to the positive terminal of your battery bank. Use an appropriate gauge wire based on the voltage and current requirements of your system.
- Connect to charge controller: Connect the other end of the wire from step 3 to the positive terminal of your charge controller. The charge controller helps regulate the charging process between your solar panels and batteries.
- Wiring connections: Now, connect another wire from the negative terminal of your battery bank to one of the DC input terminals on your inverter. Similarly, connect another wire from one of these terminals to the negative terminal on your charge controller.
- Finalize connections: Double-check all connections before proceeding further. Ensure that they are secure and properly insulated with appropriate connectors or heat shrink tubing to prevent any electrical hazards.
- AC output connection: Connect the AC output of your inverter to your home’s electrical panel or load center. This step may require assistance from a licensed electrician to ensure compliance with local regulations and safety standards.
Remember, safety should always be a top priority when working with electricity. If you are unsure about any aspect of the installation process, it is recommended to consult a professional electrician or solar installer.
Pros and Cons of DIY Solar Panels
Advantages of DIY Solar Panel Installation
Many homeowners are considering the do-it-yourself (DIY) route. There are several advantages to taking on the project yourself that make it an appealing option for those looking to harness the power of the sun while saving money.
One significant advantage of DIY solar panel installation is cost savings. By eliminating the need for professional installation services, homeowners can potentially save thousands of dollars. With solar panel kits readily available in the market, you can purchase all the necessary components at a fraction of the cost compared to hiring a professional installer.
Another benefit is customization options. When you install your own solar panels, you have complete control over the design and placement. You can choose where to position them on your property to maximize sunlight exposure and achieve optimal energy production. DIY installations allow for greater flexibility in expanding your system as your energy needs grow over time.
Potential Challenges and Drawbacks
While there are undeniable advantages to DIY solar panel installation, it’s important to be aware of potential challenges and drawbacks before embarking on this project.
One primary consideration is technical expertise. Installing solar panels requires a certain level of knowledge about electrical systems and construction practices. If you lack experience in these areas, it may be challenging to ensure proper wiring connections or securely mount the panels. It’s crucial to thoroughly research and educate yourself about all aspects of solar panel installation before diving into the project.
Another drawback is time commitment. DIY installations typically take longer than professional installations since you will be learning as you go along. This means dedicating significant time and effort into planning, researching, and executing each step correctly. If you’re working with limited free time or have other commitments, such as a full-time job or family responsibilities, this may pose a challenge.
Weighing the Pros and Cons
Before making a decision about DIY solar panels, it’s essential to weigh the pros and cons carefully. Consider your personal circumstances, skills, and resources to determine if this is the right path for you.
To help you make an informed decision, here’s a breakdown of the key points:
Pros of DIY Solar Panels:
- Cost savings compared to professional installation
- Customization options for design and placement
- Flexibility in expanding the system over time
Cons of DIY Solar Panels:
- Requirement of technical expertise in electrical systems and construction practices
- Time commitment due to learning curve and research involved
Ultimately, the decision boils down to your comfort level with taking on a project of this magnitude. If you are confident in your abilities, willing to invest time into learning, and seeking cost savings while having control over your solar panel system, then DIY installation may be a viable option for you.
Remember that safety should always be a top priority when working with electricity. If at any point during the process you feel unsure or uncomfortable, it is best to consult with a professional installer who can ensure a safe and efficient installation.
By carefully considering the pros and cons outlined above, you can make an informed decision about whether DIY solar panel installation aligns with your goals and capabilities.
Is DIY Solar Panel Installation Worth it in 2023?
Analyze current market trends and costs associated with professional installation
Before deciding whether to embark on a DIY solar panel installation project, it’s crucial to analyze the current market trends and understand the costs associated with professional installation. The solar industry has been rapidly evolving, with advancements in technology leading to more affordable options for homeowners.
Professional installation typically comes with a higher price tag due to labor costs and expertise. However, it offers the convenience of having trained professionals handle the entire process, from system design to obtaining permits and ensuring compliance with local regulations. Reputable installers often provide warranties that can protect your investment in case of any issues.
Evaluate your own skills, time availability, and budget constraints
When considering a DIY approach for installing solar panels, it’s essential to evaluate your own skills, time availability, and budget constraints. Installing solar panels requires a certain level of technical knowledge and expertise. If you have experience working with electrical systems or have successfully completed similar projects before, you may be well-suited for a DIY installation.
However, keep in mind that solar panel installation involves various tasks such as mounting panels on rooftops, connecting wiring correctly, and configuring inverters. If you lack confidence or familiarity with these tasks, it might be wise to seek professional assistance.
Time availability is another crucial factor. Installing solar panels can be time-consuming as it involves multiple steps like site assessment, system design planning, obtaining necessary permits from local authorities, and actual panel installation. Consider whether you have enough free time to dedicate yourself fully to completing the project efficiently.
Budget constraints also play a significant role in determining whether DIY solar panel installation is worth it for you. While opting for a DIY approach can save money on labor costs associated with professional installations, there are still expenses involved such as purchasing the necessary equipment (solar panels, inverters) and tools required for proper installation. It’s important to research and compare prices to ensure you can afford all the components needed for a successful installation.
Consider long-term savings versus upfront investment for a DIY approach
One of the primary reasons homeowners opt for solar panel installation is the potential for long-term savings on energy bills. With rising electricity costs, generating your own clean and renewable energy can significantly reduce your monthly expenses over time. However, it’s crucial to weigh these long-term savings against the upfront investment required for a DIY approach.
While professional installations may have higher initial costs, they often come with warranties and guarantees that provide peace of mind. On the other hand, if you choose to install solar panels yourself, you’ll need to carefully calculate whether the money saved on labor costs justifies any potential risks or issues that may arise in the future.
Make an educated decision based on your specific circumstances
Ultimately, deciding whether DIY solar panel installation is worth it in 2023 requires careful consideration of all these factors in light of your specific circumstances. If you possess the necessary skills, have ample time available, and are confident in managing potential challenges that may arise during installation, then going the DIY route could be a viable option.
However, if you lack technical expertise or find yourself short on time and resources, it might be more prudent to hire professionals who can ensure a seamless installation process while providing valuable warranties and guarantees.
Remember that each homeowner’s situation is unique.
Introduction to DIY Solar Panel Installation Guide
Are you ready to embark on a journey towards harnessing solar power at home? With this comprehensive DIY Solar Panel Installation Guide, you can take the first step towards energy independence. By installing solar panels yourself, you not only contribute to a sustainable future but also enjoy numerous benefits along the way. Let’s dive into what this guide has in store for you.
Get started on your journey to harnessing solar power at home
With rising energy costs and increasing environmental concerns, many homeowners are turning to solar power as an alternative source of energy. By installing solar panels on your property, you can generate electricity from the sun’s rays and reduce your reliance on traditional grid-based power. This guide will provide you with all the necessary information and steps needed to get started on your own DIY solar panel installation project.
Discover how this guide can help you achieve energy independence
Energy independence is a goal that many individuals strive for. By generating your own electricity through solar panels, you can significantly reduce or even eliminate your monthly utility bills. This guide will empower you with the knowledge and skills required to install and maintain your solar panel system effectively. From understanding the components needed to calculating the optimal size of your system, every aspect will be covered in detail.
Learn about the benefits of installing solar panels yourself
Installing solar panels yourself offers several advantages beyond just cost savings. Firstly, it allows you to have complete control over the entire process, ensuring that everything is done according to your preferences and requirements. By taking a hands-on approach, you gain valuable knowledge about how your system works and become proficient in troubleshooting any issues that may arise in the future.
Furthermore, DIY installation provides a sense of accomplishment and pride in knowing that you have taken an active role in reducing carbon emissions and promoting renewable energy sources. Not only do you save money over time, but also contribute positively towards creating a sustainable future for generations to come.
Find out what topics will be covered in this comprehensive guide
This DIY Solar Panel Installation Guide covers a wide range of topics to ensure you have all the information you need. Here’s a sneak peek at what you can expect:
- Understanding solar energy and how it works
- Assessing your home’s solar potential
- Calculating your energy needs and determining system size
- Selecting the right type of solar panels and other equipment
- Obtaining necessary permits and approvals
- Installing the mounting system and positioning the panels effectively
- Properly wiring your solar panel system
- Conducting safety inspections and maintenance procedures
By following this guide, you’ll gain the confidence to install your own solar panel system successfully.
So, are you ready to take control of your energy usage, reduce your carbon footprint, and save money on electricity bills? Let’s dive into this DIY Solar Panel Installation Guide together!
Designing and Sizing Your Solar System
Calculating your energy needs accurately is crucial. By determining the system size requirements, you can ensure that your solar energy system meets your power demands effectively.
Factors such as location, climate, and usage patterns play a significant role in the design of your solar system. The amount of sunlight available in your area will impact how much energy can be generated by the panels. For instance, if you live in a region with abundant sunshine throughout the year, you might require fewer panels compared to someone residing in a cloudy or shaded area.
Understanding different types of solar panels available on the market is essential for making an informed decision. There are various options to choose from, including monocrystalline, polycrystalline, and thin-film panels. Each type has its own advantages and disadvantages based on factors like efficiency, cost, and aesthetics.
To begin designing a customized solar system for optimal performance, follow these step-by-step instructions:
- Assess Your Energy Needs: Start by evaluating your average daily electricity consumption. This information can usually be found on your utility bills or by using an energy monitoring device. Consider any future changes in energy usage as well.
- Calculate Required System Size: Once you have determined your energy needs, calculate the size of the solar array required to meet those demands. This calculation involves considering factors such as panel wattage, sunlight availability in your area, and desired level of self-sufficiency.
- Choose Inverter and Racking System: Select an appropriate inverter based on the size of your PV system and whether you plan to connect it to the grid or use it off-grid. Decide on a suitable racking system that securely mounts the panels while optimizing their exposure to sunlight.
- Create a System Diagram: Sketch out a diagram illustrating the placement of panels, inverter, and other components. This will help you visualize the layout and ensure a smooth installation process.
- Procure Necessary Parts: Make a list of all the required components for your solar project, such as solar panels, inverters, wiring, mounting hardware, and safety equipment. Research reputable suppliers to obtain high-quality parts at competitive prices.
- Installation and Wiring: Follow manufacturer instructions to install the solar panels on your roof or ground-mounted system. Connect them in series or parallel depending on your system design. Ensure proper grounding and wire management for safety and optimal performance.
By following these guidelines, you can successfully design and size your DIY solar panel installation guide according to your specific energy needs. Remember to consult local regulations and seek professional assistance if needed during any stage of the process.
Now that you have a solid understanding of designing and sizing a solar system, let’s move on to the next step: selecting the right equipment for your project.
Pros and Cons of DIY Solar Panels and Kits
Advantages of Using Pre-Packaged Kits for Easy Installation
Many homeowners are turning to do-it-yourself (DIY) options as a cost-effective and sustainable solution. One popular choice is using pre-packaged kits that provide all the necessary components and instructions for installation. There are several advantages to opting for these kits.
Firstly, pre-packaged kits simplify the installation process. They come with detailed instructions that guide even beginners through each step, making it easier for individuals with limited technical knowledge to set up their own solar panel system. These kits typically include everything from the panels themselves to the wiring, connectors, and mounting hardware required for installation. By having all the components conveniently packaged together, homeowners can save time and effort in sourcing individual parts.
Another advantage is that pre-packaged kits ensure compatibility between different components. Each kit is carefully designed by manufacturers who have already done the research and testing to ensure that all the included parts work seamlessly together. This eliminates any guesswork or potential issues that may arise when trying to mix and match components from different suppliers.
Moreover, using a kit can be a more affordable option compared to customizing an entire system. The cost of purchasing individual solar panels, inverters, batteries, and other necessary equipment can quickly add up. However, pre-packaged kits are often priced competitively as manufacturers leverage economies of scale when producing large quantities of standardized systems.
Potential Limitations or Restrictions When Opting for a Kit-Based Approach
While there are clear advantages to using pre-packaged solar panel kits, it’s important to consider some potential limitations or restrictions associated with this approach.
One limitation is the lack of customization options available with ready-made kits. These packages are designed to cater to a wide range of users and may not meet specific requirements or preferences of every homeowner. For instance, if you have limited roof space or specific aesthetic preferences, a pre-packaged kit may not provide the flexibility needed to address these concerns.
Kits may not always include the highest quality components. Some manufacturers may prioritize affordability over durability or efficiency. It’s essential to research and choose reputable brands that offer reliable products to ensure long-term performance and maximize energy generation.
Comparing Pros and Cons Between Fully Customizing a System Versus Using Kits
When deciding between fully customizing a solar panel system or using pre-packaged kits, it’s crucial to weigh the pros and cons of each approach based on your preferences, skills, and budget.
Fully customizing a system allows for greater flexibility in terms of design, component selection, and system size. This option is ideal for individuals who have specific requirements or want complete control over every aspect of their solar installation. However, customization requires more technical knowledge and research to ensure compatibility between different components.
On the other hand, using pre-packaged kits offers convenience, simplicity, and lower upfront costs. These kits are suitable for beginners or those who prefer a hassle-free installation process. While they may lack some customization options, they provide an efficient solution for homeowners looking to harness solar energy without extensive technical expertise.
Making an Informed Decision Based on Your Preferences, Skills, and Budget
Ultimately, the decision between DIY solar panels with pre-packaged kits or fully customized systems depends on your individual circumstances.
Exploring the Pros and Cons of DIY Solar
Benefits of Taking Control Over Your Own Energy Production
Are you tired of relying on traditional energy sources and want to take control over your own energy production? DIY solar panel installation might be the perfect solution for you. By harnessing the power of direct sunlight, you can generate clean and renewable energy right from your own backyard.
One of the major benefits of DIY solar is the cost savings it offers. Traditional energy costs can be a significant burden on households, but by installing solar panels yourself, you can reduce or even eliminate your monthly electricity bills. With various state and federal incentives available for renewable energy installations, you may be eligible for tax credits or rebates that further offset the initial investment.
Another advantage is the customization options available with DIY solar. You have the freedom to design a system that perfectly fits your needs and preferences. Whether you want to power your entire home or just specific appliances, DIY allows you to tailor your installation accordingly.
Potential Challenges and Risks Associated with Self-Installation
While there are numerous benefits to going down the DIY route for solar panel installation, it’s important to consider potential challenges and risks as well. One key factor is expertise. Installing solar panels requires technical knowledge about electrical systems and roofing structures. If you’re not familiar with these aspects, it’s crucial to educate yourself thoroughly before starting the project.
Safety concerns should not be overlooked. Working with electrical components poses certain risks if not handled correctly. It’s essential to follow proper safety protocols and use protective equipment during installation.
Weighing the Pros and Cons: Is DIY Solar Right for You?
Deciding whether DIY solar is the right choice for you involves weighing its pros and cons against your individual circumstances. Consider factors such as cost savings, customization options, and long-term maintenance requirements.
On one hand, DIY solar provides an opportunity for substantial cost savings in the long run. By reducing or eliminating your electricity bills, you can potentially recoup the initial investment within a few years. Moreover, with customization options, you can create a system that aligns perfectly with your energy needs and goals.
On the other hand, DIY solar installation may not be suitable for everyone. If you lack technical expertise or feel uncomfortable working on your roof, it might be wiser to hire a professional installer. While maintenance requirements are generally low for solar panels, occasional cleaning and inspection are necessary to ensure optimal performance.
Video Guide: Step-by-Step Solar Panel Installation
If you’re considering a DIY solar panel installation, having a visual guide can be incredibly helpful. With a step-by-step video guide, you can follow along with experts as they demonstrate each stage of the installation process in detail. This not only provides a clear understanding of what needs to be done but also instills confidence by allowing you to see the entire process in action before attempting it yourself.
One of the main benefits of using a video guide for your solar panel installation is that it offers a comprehensive walkthrough of each step involved. From mounting the panels on your roof to connecting them to your electrical system, every aspect is covered in great detail. By watching experienced professionals perform these tasks, you’ll gain valuable insights and learn best practices that can help ensure a successful installation.
In addition to the step-by-step instructions, video guides often provide additional tips and tricks that are crucial for achieving optimal results. These tips may include advice on selecting the right tools and equipment, identifying potential challenges or obstacles during installation, and troubleshooting common issues that may arise. Having access to this wealth of knowledge can save you time and prevent costly mistakes.
Another advantage of utilizing a video guide is that it allows you to pause, rewind, and rewatch specific sections as needed. This flexibility ensures that you don’t miss any important details or instructions along the way. Whether you need to review a particular technique or clarify a concept, being able to revisit specific parts of the video at your own pace can greatly enhance your understanding and confidence throughout the installation process.
By following along with experts through a video guide, you’ll also have an opportunity to see firsthand how certain challenges are overcome or creative solutions are implemented. This exposure not only expands your knowledge but also prepares you for potential hurdles that may arise during your own DIY project. Learning from real-life examples helps build problem-solving skills and equips you with strategies to handle unexpected situations.
Determining System Size Based on Energy Needs
Calculating the appropriate system size is a crucial step in your DIY solar panel installation journey. By accurately determining your energy needs, you can ensure that your solar power system is optimized for efficiency and cost-effectiveness. Let’s dive into the key factors to consider when sizing your system.
Calculate Your Average Energy Consumption
To determine the size of your solar panel system, start by calculating your average energy consumption. This involves reviewing your utility bills over a 12-month period to get an idea of how much electricity you typically use. Look for the monthly kilowatt-hour (kWh) usage and note down the highest value.
Understanding your energy consumption patterns will give you an estimate of how much electricity your solar panels need to generate to meet those demands. Keep in mind that this calculation should be based on typical usage rather than peak demand.
Factors Affecting Energy Production
Several factors influence the amount of energy your solar panels can produce, including location and climate. The availability of sunlight varies depending on where you live, so it’s essential to consider these variables when sizing your system.
- Location: Different regions receive varying amounts of sunlight throughout the year. Areas with more sunshine will generally require smaller systems compared to those in cloudier regions.
- Climate: Climate conditions such as temperature and humidity can impact solar panel performance. Extremely hot temperatures may reduce overall efficiency, while cooler climates can optimize energy production.
It’s worth noting that advancements in technology have made solar panels more efficient even in less sunny areas, so don’t let location deter you from exploring solar options.
Future Growth and Changing Needs
When determining system size, it’s important to think ahead and consider any future growth or changes in energy needs. Are there plans to expand your household? Will you be adding new appliances or electric vehicles? Anticipating these developments allows you to account for potential increases in energy consumption.
To accommodate future growth, consider sizing your system slightly larger than your current needs. This way, you can harness excess energy and potentially sell it back to the grid through net metering programs. It’s always better to have a bit of extra capacity rather than falling short as your energy demands evolve.
Optimizing Efficiency and Cost-Effectiveness
Optimizing your system size is crucial for both efficiency and cost-effectiveness. Installing an oversized system may lead to unnecessary expenses, while an undersized one might not meet your energy requirements. Striking the right balance is key.
- Efficiency: By accurately sizing your solar panel system, you ensure that it generates enough electricity to power your home without wasting resources.
- Cost-effectiveness: An appropriately sized system helps you avoid overspending on unnecessary equipment while still meeting your energy needs.
Consider consulting with solar professionals or using online calculators that take into account factors like location, climate, average consumption, and future growth projections to determine the optimal system size for your specific situation.
Post-Installation Steps and Related Posts
Congratulations on completing your DIY solar panel installation! Now that you have successfully harnessed the power of the sun, it’s important to take a few additional steps to ensure everything is running smoothly.
Learn about important steps to take after completing your solar panel installation
After installing your solar panels, there are a few crucial steps you should follow to optimize their performance and ensure their longevity. Here are some key actions to consider:
- Inspect Your Installation: Conduct a thorough inspection of your system to check for any loose connections or potential issues. This will help identify any problems early on and prevent them from escalating.
- Connect to the Grid: If you haven’t already done so during the installation process, connect your solar panels to the electrical grid. This step allows you to sell excess energy back to the grid or draw electricity when needed.
- Register Your System: Check with your local authorities or utility company regarding any necessary registrations or permits required for operating a solar panel system in your area.
- Insurance Coverage: Contact your insurance provider to update your policy and ensure that your newly installed solar panels are adequately covered.
- Monitor Performance: Install a monitoring system that allows you to track how much energy your panels are producing on a regular basis. This will help you identify any underperforming panels or potential issues promptly.
Explore related posts on topics like maintenance, monitoring, and optimizing performance
To further enhance your knowledge about maintaining and maximizing the efficiency of your DIY solar panel installation, here are some useful articles worth exploring:
- “Essential Maintenance Tips for Solar Panels”: Discover best practices for cleaning, inspecting, and maintaining your panels.
- “Monitoring Your Solar Panels: Why It Matters”: Learn why monitoring is crucial for identifying any performance issues and how to choose the right monitoring system.
- “Optimizing Solar Panel Performance”: Explore strategies to maximize your solar panels’ output, including panel positioning, shading mitigation, and optimizing inverter settings.
Discover how to claim incentives or rebates for installing solar panels
Installing solar panels not only helps you save money on electricity bills but also opens up opportunities for claiming incentives and rebates. Here’s what you need to know:
- Federal Incentives: Check if you qualify for federal incentives such as the Investment Tax Credit (ITC), which can significantly reduce the cost of your solar panel installation.
- State and Local Programs: Research state-specific programs that offer additional incentives or grants for going solar. Many regions provide rebates based on the size of your system or energy production.
- Utility Company Programs: Some utility companies offer their own incentives, such as net metering programs that allow you to earn credits for excess energy fed back into the grid.
Find resources for ongoing support and troubleshooting
Even with a well-installed DIY solar panel system, occasional issues may arise. It’s essential to have access to resources that can help you troubleshoot problems effectively. Consider the following options:
- Online Communities: Join online forums or communities where experienced installers and enthusiasts share their knowledge and offer support.
- Manufacturer Support:
Understanding Energy Needs for System Design
To successfully install a DIY solar panel system, it is crucial to have a clear understanding of your energy needs and how they relate to the design of your system. By accurately calculating your current energy usage and considering future changes in energy needs, you can ensure that your solar system meets both current and future electricity requirements.
Calculate your current energy usage accurately using utility bills or online tools
Before diving into the world of renewable energy, it is essential to assess your current energy consumption accurately. This will provide you with a baseline for determining the size and capacity of the solar panel system you need. To calculate your energy usage:
- Gather utility bills: Take a look at your past year’s utility bills to get an idea of how much electricity you consume on average each month.
- Online tools: Utilize online calculators specifically designed to estimate energy consumption based on factors such as household size, appliances used, and geographic location.
Determine peak demand periods to size your system accordingly
Understanding when you experience peak demand periods throughout the day allows you to properly size your solar panel system. Consider these factors:
- Time of day: Identify when electricity consumption peaks in your household. This may coincide with activities like cooking dinner or running multiple appliances simultaneously.
- Seasonal variations: Take note of any significant variations in electricity usage between seasons. For example, heating or cooling demands during extreme temperatures can significantly impact overall consumption.
By identifying these peak demand periods, you can ensure that your solar panel installation provides enough power during those times without overbuilding.
Consider future changes in energy needs due to lifestyle or household expansion
While assessing current energy needs is important, it’s equally crucial to consider potential changes in the future that may impact electricity requirements:
- Lifestyle changes: Will there be any major shifts in how you use electricity? For instance, if you plan on purchasing electric vehicles or adding energy-intensive appliances like a hot tub or pool, your energy needs will increase.
- Household expansion: If you anticipate expanding your household by adding more family members or incorporating additional living spaces, it’s essential to account for the increased energy demands.
By considering these future changes, you can avoid the need for significant system upgrades down the line and ensure that your solar panel installation remains efficient and effective.
Ensure your solar system can meet both current and future electricity requirements
Finally, when designing your DIY solar panel system, it is crucial to ensure that it can meet both current and future electricity requirements. This involves:
- Sizing the system correctly: Based on your calculated energy needs and peak demand periods, determine the appropriate size of your solar panel array. This ensures sufficient power generation throughout the day.
- Battery storage: If you require backup power during outages or want to store excess energy generated by your panels for later use, consider incorporating battery storage into your system design.
By carefully considering both current and future electricity requirements, you can create a DIY solar panel installation that provides reliable renewable energy while accommodating any potential changes in usage patterns.
Remember, understanding your energy needs is fundamental to designing an effective DIY solar panel installation guide. By accurately calculating current usage, identifying peak demand periods, considering future changes in energy needs, and ensuring adequate system capacity, you’ll be well on your way to harnessing renewable energy efficiently.
Exploring Different Types of Solar Panel Mounts
Choosing the right mounting option is crucial for optimal performance and longevity. We will discuss important considerations such as tilt angles, tracking systems, and other factors that should be taken into account when selecting mounts. By the end of this guide, you’ll be equipped with the knowledge needed to make an informed decision based on factors like space availability, aesthetics, and sun exposure.
Roof-Mounted Systems
Roof mounts are a popular choice for residential solar panel installations due to their convenience and space-saving design. These mounts are typically attached directly onto the roof surface or integrated into roofing materials. Here are some key points to consider when opting for a roof-mounted system:
- Advantages:
- Utilizes existing structure: Roof-mounted systems make efficient use of available space on your property without requiring additional land.
- Aesthetically pleasing: The panels blend seamlessly with your home’s architecture since they are installed flush with the roof.
- Increased sun exposure: Roof mounts often have better access to sunlight compared to ground-mounted systems that may be obstructed by shading.
- Disadvantages:
- Limited tilt angle options: Roof mounts usually have fixed tilt angles that cannot be easily adjusted to maximize energy production throughout the year.
- Potential roof damage: Installation may require drilling holes in your roof, which could lead to leaks if not done correctly. It is essential to hire experienced professionals for this task.
Ground-Mounted Systems
Ground mounts offer flexibility in terms of positioning and adjustability. They can be installed in open areas or even on poles if desired. Let’s explore their advantages and disadvantages:
- Advantages:
- Optimal tilt angle adjustment: Ground-mounted systems allow for easy modification of the tilt angle, ensuring maximum exposure to sunlight throughout the year.
- Simplified maintenance: Panels installed on the ground are easily accessible, making cleaning and maintenance tasks more convenient.
- No roof-related concerns: With ground mounts, you eliminate the risk of potential roof damage during installation.
- Disadvantages:
- Requires additional space: Ground-mounted systems occupy more land compared to their roof-mounted counterparts. Sufficient open space is necessary for installation.
- Aesthetics and visual impact: Some homeowners may find ground mounts less visually appealing since they are not integrated into the existing structure like roof mounts.
When choosing between roof-mounted and ground-mounted systems, it’s crucial to consider factors such as available space, aesthetic preferences, and sun exposure. If your property has limited open space but ample unobstructed sunlight on the roof, a roof-mounted system might be ideal. On the other hand, if you have enough land available and wish for greater flexibility in adjusting panel angles or avoiding potential roof issues altogether, a ground mount could be a better choice.
Remember that professional assistance is essential when installing solar panel mounts to ensure safety and proper functionality. By carefully evaluating your specific needs and considering these options’ advantages and disadvantages, you’ll be well-equipped to make an informed decision that suits your requirements.
Essential Tools for DIY Solar Panel Installation
Installing solar panels on your own can be a rewarding and cost-effective endeavor. However, to ensure a successful installation, it is crucial to have the right tools at your disposal. Here are the essential tools you will need for your DIY solar panel installation:
- Power Drill: A power drill is an indispensable tool for securing solar panels onto rooftops or other surfaces. Make sure to use a drill with adjustable torque settings to prevent overtightening and damaging the panels.
- Screwdriver Set: A set of screwdrivers will come in handy when assembling various components of the solar kit, such as junction boxes or mounting brackets. Opt for both Phillips and flathead screwdrivers to accommodate different types of screws.
- Wire Strippers: Wire strippers allow you to remove insulation from electrical wires without damaging the conductive copper inside. This tool ensures clean connections between the solar panels, inverters, and batteries.
- Crimping Tool: A crimping tool is essential for securely connecting wires together using crimp connectors or lugs. It provides a reliable and durable connection that withstands environmental conditions.
- Multimeter: A multimeter is used to measure voltage, current, and resistance during installation and troubleshooting processes. It helps ensure that your solar panel system operates optimally by detecting any potential issues.
- Ladder: Depending on the height of your roof or installation location, a sturdy ladder will be necessary for accessing the area safely during installation or maintenance tasks.
- Safety Equipment: Prioritize safety by equipping yourself with personal protective equipment (PPE) such as gloves, safety glasses, and a hard hat if required by local regulations.
- Sealant/Adhesive: To weatherproof connections and prevent water infiltration, use an appropriate sealant or adhesive recommended for outdoor applications when attaching mounting hardware or sealing cable entry points.
- Level: A level ensures that your solar panels are installed horizontally and evenly, optimizing their performance and preventing potential water pooling on the surface.
- Cable Clips/Ties: Use cable clips or ties to secure wiring neatly along the installation path, minimizing the risk of damage or accidental disconnection.
Before embarking on your DIY solar panel installation project, ensure you have all these tools readily available. Having everything at hand will save time and prevent unnecessary delays during the installation process. Remember to follow safety guidelines while handling tools and working at heights to minimize any risks associated with the project.
By arming yourself with these essential tools, you’ll be well-prepared to tackle your DIY solar panel installation confidently and successfully harness renewable energy for your home.
Assessing Property for Best Solar Panel Placement
To ensure the success of your DIY solar panel installation, it is crucial to assess your property and determine the best placement for maximum sunlight exposure. Here are some key factors to consider when evaluating your property:
Evaluate your property’s sun exposure throughout the day
Start by observing how the sun moves across your property throughout the day. Take note of areas that receive direct sunlight for the longest duration. These spots will be ideal for installing solar panels as they will generate the most electricity. Keep in mind that solar panels operate at their peak efficiency when exposed to direct sunlight.
Identify potential shading sources like trees or nearby buildings
Shading can significantly impact the performance of your solar panels. Identify any potential shade sources such as tall trees, neighboring buildings, or other structures that may obstruct sunlight from reaching your panels. It is important to choose a location with minimal shading to maximize energy production.
Consider roof orientation, pitch, and structural integrity
If you plan on mounting solar panels on your roof, consider its orientation and pitch. South-facing roofs generally receive more sunlight throughout the day, making them an excellent choice for installation. Evaluate the structural integrity of your roof to ensure it can support the weight of the solar panels without any issues.
Choose the optimal location on your property for maximum sunlight exposure
After considering all these factors, select an optimal location on your property that meets all requirements for maximum sunlight exposure. This could be a section of your roof or an open area in your yard if ground-mounted panels are preferred.
Remember that every property is unique, so take into account its specific characteristics when assessing placement options. For instance, if you have limited space on your roof or face shading challenges due to nearby structures or trees, ground-mounted panels might be a better alternative.
By carefully evaluating and selecting the best placement for your solar panels based on sun exposure, shading sources, roof orientation, and structural integrity, you can optimize the efficiency and effectiveness of your DIY solar panel installation.
Conclusion: DIY Solar Panel Installation Guide
Congratulations on completing the DIY Solar Panel Installation Guide! By following the step-by-step process outlined in this guide, you have gained the knowledge and skills necessary to install your own solar panel system.
Throughout this guide, we discussed various aspects of DIY solar panel installation, including assessing property for optimal placement, designing and sizing your system, shopping for equipment and safety gear, and the actual installation process. We also explored connecting a solar inverter and battery (if desired) and weighed the pros and cons of going the DIY route.
DIY solar panel installation offers several advantages. It allows you to save money by avoiding professional installation costs while gaining a sense of accomplishment from completing the project yourself. Installing your own solar panels gives you control over the quality and performance of your system.
However, it’s important to consider some potential drawbacks as well. DIY installations require time, effort, and careful attention to detail. You must also ensure that you have adequate knowledge of electrical systems to ensure safety during installation.
Is DIY solar panel installation worth it in 2023? Absolutely! With advancements in technology and decreasing costs of solar equipment, now is a great time to embrace renewable energy by installing your own solar panels.
In conclusion, this guide has provided you with all the information needed to confidently embark on your DIY solar panel installation journey. Remember to always prioritize safety throughout each step of the process. Now it’s time for you to take action and start harnessing clean energy from the sun!
FAQs
Q: How long does it take to install a DIY solar panel system?
Installing a DIY solar panel system can vary depending on factors such as system size, complexity of installation site, and individual experience level. On average, it may take anywhere from a few days to several weeks.
Q: Can I install a DIY solar panel system if I have no prior electrical experience?
While prior electrical experience can be beneficial, it is not always necessary. However, it is crucial to educate yourself thoroughly on electrical safety and the specific requirements of your installation before proceeding.
Q: Will installing DIY solar panels affect my home insurance?
It is advisable to contact your home insurance provider before installing DIY solar panels. Some insurance companies may require additional coverage or adjustments to your policy to account for the presence of a solar panel system.
Q: How much money can I save by installing DIY solar panels?
The amount of money you can save with a DIY solar panel installation depends on various factors such as your energy consumption, local electricity rates, and the size and efficiency of your system. On average, homeowners can potentially save thousands of dollars over the lifetime of their system.
Q: Are there any government incentives or rebates available for DIY solar installations?
Government incentives and rebates for DIY solar installations vary by location. It is recommended to research local programs, tax credits, and grants that may be available in your area to help offset the costs of installation.